EdgeRider Wheels for
Gammill Quilting Machines
Our wheels for the Gammill quilting machine represents years of engineering and testing by our company and customers like you. Our wheels were designed specifically for each machine and its track system, not reused from another industry like our competitors. These wheels are manufactured with strict tolerances and are used by thousands of customers.
Where to buy
 You can only purchase EdgeRider Wheels for Gammill Quilting Machines through our authorized dealers. If they do not have the authorized dealer logo they are not selling you the Genuine EdgeRider Wheels. View the list of our dealers and contact them to purchase your set.
About Gammill Quilting Systems
![]() Gammill Quilting Systems, the world's leader in longarm quilting technology, offers 3 longarm quilting machines to fit any space, lifestyle, need, or budget. With the Optimum, Classic, & Premier models, Gammill offers superior quality products with an unprecedented 4 year parts and service warranty. Any of the models can be purchased with or without the stitch regulator. Retrofitting of the stitch regulator is available for many older Gammill models.
Gammill Quilting Systems, the world's leader in longarm quilting technology, offers 3 longarm quilting machines to fit any space, lifestyle, need, or budget. With the Optimum, Classic, & Premier models, Gammill offers superior quality products with an unprecedented 4 year parts and service warranty. Any of the models can be purchased with or without the stitch regulator. Retrofitting of the stitch regulator is available for many older Gammill models.
EdgeRider Wheels Fit These Gammill Machines
- Gammill Premier
- Gammill Premier Plus
- Gammill Classic
- Gammill Classic Plus
- Gammill Classic
- Gammill Optimum Plus
- Statler Stitcher® Premier
- Statler Stitcher® Classic
- Statler Stitcher® Optimum
- Statler Stitcher® Supreme
Installation Instructions for Gammill Quilting Machines
Download now in PDF.PARTS THAT COME WITH THE KIT
- 2- sliding hub wheels (remove tape)
- 6 - fixed hub wheels
- 8 - thin washers
- 8 - thick washers
- 2 - shoulder bolts
- 4 - Metric/Fine thread 1 inch socket head screws (for older Gammill Machines)
- 4 - Standard/Course thread 1 inch socket head screws
- 4- 1-1/4 inch Hex head bolt – (2 for the parking wheels)
- 2 - Jam Nuts (brass color)
- 2 - ¼-10 Nuts (silver)
TERMINOLOGY
- Sliding hub wheel – wheel that comes with tape on the center (remove) that has a sliding center sleeve
- Fixed hub wheel – wheel where center does not move in out, does not extend beyond bearings
If you are missing any parts from your kit contact your dealer or us directly at support@edgeriderwheels.com. Most bolts can be purchased from a hardware store and in most cases your original bolts can be reused as well.
INSTALLING THE WHEELS ON THE CARRIAGE
 Lift the back of the carriage and rest it on a block, or the handle of a larger screwdriver to make the wheel replacement easier.
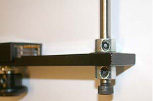
There are four wheels at the back of the carriage. The two in the middle are the parking wheels. You will replace the two outer wheels.
 The alignment of the parking wheels needs to be adjusted by adding one thin and two thick washers between them and the rear bracket. Thparking wheels should not touch the tracks when quilting. You may need to change the washer thickness to ensure this (e.g. replacing one thick washer with a thin one, or add another thin washer, etc). In somcases the parking wheels will have to be completely removed. We included 2 hex head bolts 1½ inch long to accommodate the parking wheels with the additional spacers.
Remove the old wheels, nuts and bolts from the back of the carriage.
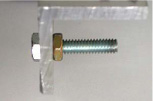
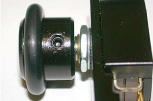
Mount the 1-1/4" bolt using the thin, yellow finish jam nut as the picture shows. Tighten the nut so the bolt sits firmly on the bracket.
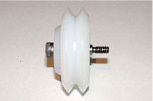 Install the wheel using the thicker nut as shown on the picture. Tighten the nut, but do not over-tighten, for it may cause drag on the wheel.
Remove the old wheels and the shoulder bolt from the front of the carriage. Using a new shoulder bolt and a non-sliding hub wheel replace the old wheels.
The wheel should slide in/out freely on the shoulder bolt to compensate for any track misalignment along the table.
INSTALLING THE WHEELS ON THE MACHINE
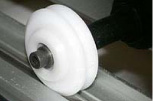 Install two wheels on the channel lock side using the same washers that were used on the original machine wheels. However, you will need to use the longer bolts included in your kit. There are fine and coarse thread bolts, use the kind that matches the threads on the existing bolts. Simply remove the old ones and put on the new wheels and bolts, making sure that the hubs are positioned on the outside.
 Remove the tape from the sliding hub wheels and install them on the other side of the machine. Check if there is enough clearance for the wheel to slide in/out while compensating for possible misalignment of the tracks. If there is not enough clearance, add/remove washers at the channel lock side.
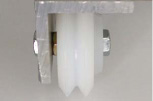
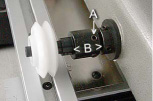
The leveling half-axles on the front can move in/out during the leveling process. Sometimes they are positioned so far out that, even without washers, the EdgeRider wheels cannot be aligned properly. If this is the case, loosen up the screws ("A") securing the half-axles ("B"). Move the arm back and forth, so the wheels find their optimum position. You can help this by pushing the half-axles in/out. Tighten the ("A") screws after the wheels were properly aligned.
You may need to realign the channel lock after installing the new wheels on the arm.
FOR GAMMILL PLUS MACHINE OWNERS
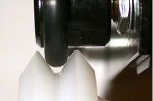 On the Plus machines the sensor wheels are running on the top of the machine's wheels. The EdgeRider wheels provide excellent supports for the rubber rings on the sensors, but only if the sensors are properly aligned. You can change the alignment of the sensor wheels in two ways:
 The wheel can be moved in/out:
- loosen the setscrew on the wheel, using a 5/64" Allen wrench
- move the wheel in/out until it sits in the middle of the groove of the EdgeRider wheel
- tighten the setscrew
 The whole bracket can be moved in/out:
- loosen the setscrews on both shaft collars, using a 3/32" Allen wrench
- move the bracket in/out until the sensor wheel sits in the middle of the groove of the EdgeRider wheel
- while maintaining the bracket position, pull the shaft collars tightly to the ball bearing
- tighten the setscrews
Move the machine and check if the sensor wheels run smoothly, without causing any drag. Realign the sensors if necessary.